
Introduction
Version control systems can go a long way in preventing developers from pulling their hair out while trying to analyze alterations and contributions made to the shared code. Simply put, a VCS is a pivotal constituent of the software configuration management system that caters to the change management needs on a project. The changes/revisions/updates made are identifiable via letter codes or numbers. Information like time stamps and the identity of the change maker is also maintained.
In this tutorial, one of the most frequently used version control systems – GIT will be talked about. You will learn GIT basics like how to install GIT on different systems and how to use it properly.
What is GIT?
In 2005, Linus Torvalds (the man known for creating the Linux OS kernel) developed GIT and since then, it has been actively maintained by Junio Hamano, a Japanese software engineer. Today, GIT is one of the most famous open-source version control systems and millions of projects around the world rely on GIT for their version control (this includes both commercial and open-source projects). GIT is a completely free software and can be downloaded for Mac, Linux, Windows, and Solaris from the official website. Some of the worth-mentioning features of GIT are:
- A distributed version control system, GIT follows a peer to peer approach unlike others such as Subversion (SVN) that follow a client-server based model.
- GIT allows developers to have a plethora of completely independent code branches. Creating, deleting and merging of these branches is seamless and takes no time.
- In GIT, all operations are atomic; that means that an action can either succeed completely or fail (without making any alterations). This is important because, in some version control systems (like CVS) where the operations are non-atomic and if a repository-wide operation is left hanging, it can leave the repository in an unstable state.
- In GIT, everything is stored within the .git folder. This is not the same in other VCS like SVN and CVS where the metadata of files is stored in hidden folders (e.g. .cvs, .svn, etc.)
- GIT uses a data model that helps in ensuring the cryptographic integrity of anything present within a repository. Every time a file is added or a commit is made, their checksums are generated; similarly, they are retrieved via their checksums as well.
- Another excellent feature present in GIT is its staging area or index. Within the staging area, developers can format commits and get them reviewed before actually applying them.
GIT is considerably simple to use. To begin with, you can either create a repository or check out an existing one. Post-installation, a simple git-init will get you all set up; conversely, git clone can set up a working copy of the local repository for a user.
Step 1 – Installing GIT on Different Systems
In the following paragraphs, the simplest ways to install GIT on different operating systems will be discussed:
Option 1 – Installing GIT on Windows:
Installing GIT on Windows OS has become as simple as downloading an installer and executing it. Perform the following steps to have GIT setup on a Windows machine:
- Visit this website and download the standalone GIT for Windows installer.
- Once downloaded, double click on the executable to start the installation wizard. Just follow the on-screen instructions, keep clicking Next and finally Finish to successfully complete the installation.
- Fire up a command prompt and in the terminal, enter the following commands:
 git config --global user.name "John Smith"
 git config --global user.email "example@email.com"
Note: Remember to replace John Smith and example@email.com with your own pertinent details. Any subsequently created commits will be associated with these details.
That’s all it takes to install GIT on Windows.
Option 2 – Installing GIT on MacOS:
There are many ways to install GIT on a Mac device; there is a chance that GIT might already be present on your computer if you have XCode installed; run the following command on a terminal to check:
git --versionIf you get an output like git version 2.7.0 (Apple Git-66), then you are lucky, but if you don’t, then perform the following steps:
- Visit this website and download the latest installer for Mac.
- Follow the on-screen instructions and finish the installation.
- Once again try the
git --versioncommand in order to confirm that the installation has been successful. - Run the following commands on a terminal to configure your email and username that are to be associated with your GIT account:
 git config --global user.name "John Smith"
 git config --global user.email "example@email.com"
Note: Remember to replace John Smith and example@email.com with your own pertinent details. Any subsequently created commits will be associated with these details.
Option 3 – Installing GIT on Linux:
If you are a Linux user, then you should be used to being able to install software and packages on your computers by using simple apt-get or yum install commands; well, installing GIT is no different:
For Debian/Ubuntu users (apt-get):
- Open a terminal and run the following commands:
Sudo apt-get update Sudo apt-get install git - Verify that you have successfully installed it by using
git --version. - Run the following commands on a terminal in order to configure your email and username that are to be associated with your GIT account:
 git config --global user.name "John Smith"
 git config --global user.email "example@email.com"
Note: Remember to replace John Smith and example@email.com with your own pertinent details. Any subsequently created commits will be associated with these details.
Fedora (yum/dnf):
You can retrieve GIT packages by using both yum and dnf.
- Open a terminal and run the following commands:
Sudo dnf install git Sudo yum install git - Verify that you have successfully installed by using
git --version. - Run the following commands on a terminal in order to configure your email and username that are to be associated with your GIT account:
 git config --global user.name "John Smith"
 git config --global user.email "example@email.com"
Note: Remember to replace John Smith and example@email.com with your own pertinent details. Any subsequently created commits will be associated with these details.
Step 2 – Using GIT
Now that GIT is all set up on your Windows/Mac/Linux device, let’s explore GIT basics and how users can get started with GIT.
Creating/setting up/checking out a repository
A repository is the strongest asset of any version-controlled project. In order to transform any directory into a GIT repository, the simple command git init <directory> can be made use of. A folder named .git should also start existing on the directory that the command was run on.Conversely, if you already have a directory and want to check it out (clone it), you can use the git clone command. If you are trying to check out a local repository, use the following command:
git clone /path/to/local/repositoryIf you intend to check a remotely stored repository, use
git clone user.name@host:/path/to/remote/repository
If you have an account on VeerITHost, you can easily clone and manage repositories via Members Area –> GIT tool. For example, if you want to clone a GIT repository, simply enter

Once creation is complete, you will be able to manage your repository in the same section.
The Workflow
Now that a repository is all set-up, let’s talk about the structure that’s maintained by GIT. Every local repository consists of three trees: the working directory which contains the actual files; the index which plays the role of a staging area and the HEAD which is a pointer to the last commit made by the user. So, this is how the workflow can be explained: the user adds a file or changes from the working directory to the index (the staging area) and once reviewed, the file or changes are finally committed to the HEAD.
The Add and Commit commands
Proposed changes or file additions are added to the index by using the addcommand. In order to add any file, the simple command is:
git add <file_name>If you are actually confident enough to make these changes in your HEAD, then you can use the commit command. The following command serves the purpose:
git commit –m “Add any message describing the commit here”Note: Once the commit command is run (from within the working directory), the file gets committed to the HEAD, but it’s still not sent to the remote repository.
Pushing the changes further
Once you have committed the changes (and believe that they are ready to be sent to the original repository), you can use the push command.Once git push origin master is executed from within the working directory, the changes present in the HEAD are sent to the remote repository. In the aforementioned command, mastercan be changed to the name of the branch that you want the changes to be committed to.If, however, an existing repository hasn’t been cloned yet and you wish to establish a connection between your repository and a remote server, do so by running the following command:
git remote add origin <server>Note: Replace
<server>by the address of the remote server.
Once cloned, any changes made will be pushed to the pertinent server.
Branches
Another brilliant (but advanced) feature of GIT is its ability to allow developers and project managers to create multiple independent branches within a single project. The primary purpose of a branch is to develop features while keeping them in isolation from each other. The default branch in any project is always the masterbranch. As many branches as required can be created and eventually merged with the master branch.A new branch can be created by using the following command:
git checkout -b feature_n *feature_n is the name of the branch
If switching back to the main master branch is desired, the following command can be used:
git checkout masterAny branch can be deleted by using the following command:
git checkout -d feature_nTo make the branch available to other users, you will have to push it to the remote repository; to do so, use the following command:
git push origin feature_nUpdating and merging
In case you want to update your local working directory to the latest one from the remote repository, the simple git pull command can be made use of.In order to merge another branch into the currently active one, use: git merge feature_n.Whether you pull or merge, GIT always tries to handle the conflicts itself, but sometimes it can’t. In case of failure due to conflicts, the user has to resolve the conflicts manually. Once you have edited the files (to eradicate conflicts), mark them as merged by using:
git add <file.name>If prior to merging you wish to view the changes, the following command can be run:
git diff <name_of_source_branch> <name_of_target_branch>Tagging
Before releasing software updates/changes, it’s always recommended to create tags. To do so on GIT, use the following command:
git tag 1.1.0 1c2d2d56faThe 1c2d2d56fa in the above command refers to the first 10 characters of the commit-id that is referenced with the tag. The commit ID can be found from the log.
Log
The repository history can be studied via the log. The git log command retrieves it. To retrieve the commits made by a single user, you can use:
git log --author =SmithA compressed version of the log (one commit per line) can be viewed by using:
git log --pretty=onelineTo view only those files that have changed:
git log --name-statusReplacing local changes
If you have somehow made a mess and want to revert the changes made to any file, do so by using the following command:
git checkout -- <filename>Doing so will replace the working tree changes with the last data present in HEAD. Any changes that have already been added to the index will not be harmed.
Conversely, if all the local changes/commits are to be dropped and the local master branch is required to point at the latest history from the server, then run the following commands:
 git fetch origin
 git reset --hard origin/master
Creating .gitignore file
You will now learn how to create a .gitignore file. It is a very useful file which specifies which files or folders of your working directory should be intentionally ignored and untracked.
Each line of this file specifies a certain pattern. This is particularly useful when you don’t want some compiler generated stuff or some unwanted file, in general, to be included in your repository. Keep in mind that .gitignore file should be created inside your project folder.
On Windows:
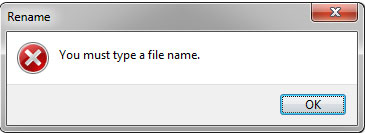
If you are using Windows as your Operating System then, creating a .gitignore file doesn’t simply work the normal way. If you try to create a file without any name you will get an error as shown below.
So to work around this problem follow the below steps.
- Create a new text file named gitignore.txt via Right Click -> New -> Text Document.
- Open the file as a normal text file in the editor of your choice and add all the rules you need to exclude the files.
- Save the file and close it.
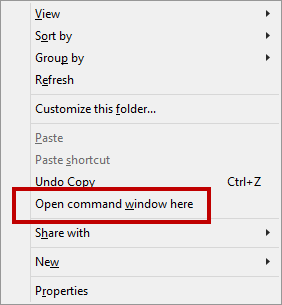
- Now open a command prompt window pointing to this folder by holding SHIFT + Right Click and then select Open Command Window here.
- Type in the following command to rename the file from gitignore.txt to .gitignore file.ren gitignore.txt .gitignore
- You have now successfully created .gitignore file.
You can also skip all the above steps and directly create the .gitignore file without any restrictions with Command Prompt opened in the directory you wish to create it using the below command.
type NUL > .gitignore
On Linux/MacOS:
In Linux and MacOS, there is no such restriction as Windows OS. So to create a .gitignore file Right Click -> New Document -> Empty Document and save document as .gitignore.

You can also use terminal to create .gitignore file with the following command:
touch .gitignore
Using .gitignore
Below you can find some typical .gitignore configurations (you can directly start adding these lines in .gitignore file).
A typical example would be to ignore all the files ending with .tmp
*.tmp
Here * stands for wildcard which means the file name can be anything but file should have an extension .tmp
You could also use something like *tmp* to ignore any file containing tmp in its name or extension.
Another common use is to ignore all the files inside a specific directory
/Output/*
This line will exclude all the files inside the Output directory.
Apart from these basic usages, if you wish to learn about more complex patterns for .gitignore file you can refer the Official Documentation.
Conclusion
In the deeply entangling realms of software projects, it’s always comforting to know that an entity is taking care of all the code-management for you. This GIT basics tutorial should allow any developer to get started with GIT, which is a rigorous (and very helpful) version control system with a plenty of features. If you want to learn more useful GIT commands, to check out our basic GIT commands tutorial.